Popular Posts

Labels

Thursday, 16 June 2016

Crow Versus Raven.


Most all of us know that the north American is a larger bird than the North American Crow but then of course it is impossible to accurately judge size, or even colour; (crows usually show other colours other than black; I have even seen some non- albinos that were pure white [no black markings whatever]) from a photo or other image. Note:  The crow pictured (right) is not an albino; as you can plainly see, the iris of the eye is not pink.
Of course with a roosting bird it is almost impossible to note the wedge shaped tail of a raven; rather than the blunt tail of a crow. However there are other infallible identifying markings which usually can be readily seen. Ravens have a tuft of feathers covering the upper beak which comes to a point, rather than being rounded off like that of a crow. The smaller STRAIGHTER beak of a crow has no such feathering (tuft). Like the white crow pictured above them, these white ravens
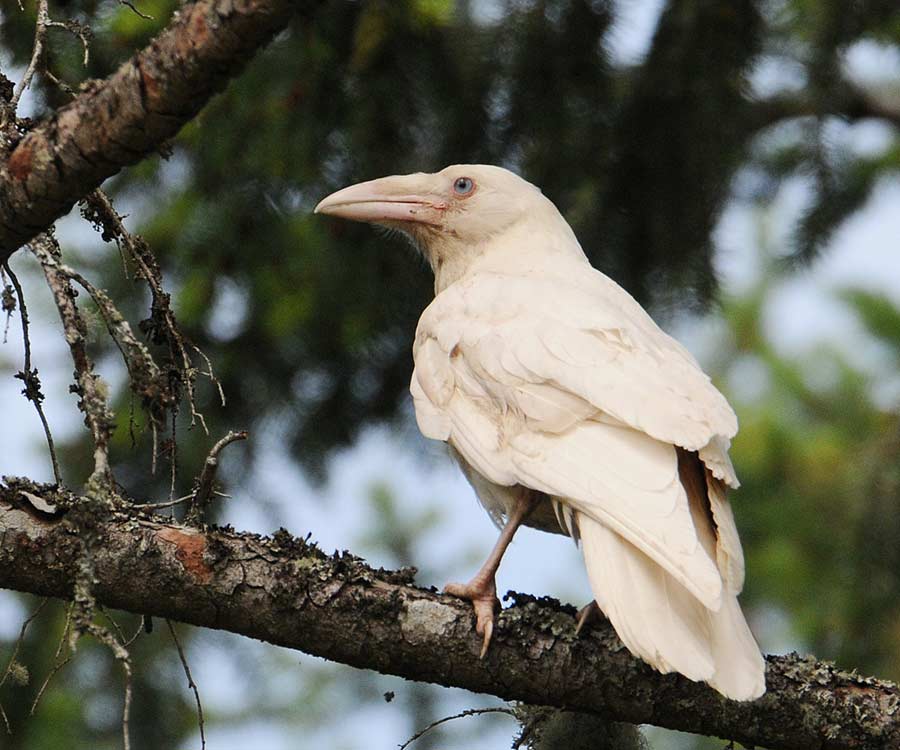


(Photographed at Qualicum Beach British Columbia are NOT albinos.


Ravens have longer rather shaggy neck feathers which crows do not have. Note in accompanying illustration (left); there are also marked differences in wing shape and way of flying. Differentiating one bird from the other should never be a problem except if you are trying to use an “ON LINE” video library such as Google images. Crows, normal life span about eight years, are much more attracted (social) to humans than is the raven; while ravens are more solitary and are much more attracted to carrion (death) than is the crow. Strangely however their life span can be thirty five years or more.~~~Al (Alex-Alexander) D. Girvan.

Sunday, 10 April 2016

How To Grow Shiitake Mushrooms Like a Boss


MAY 23 2013 This article will be broken up into two sections. The first is for the hobby grower who perhaps wants to introduce their kids to a fun project or someone just looking for the occasional small scale harvest. This is plenty for a family that eats mushrooms a few times a month.
The second section is for all your die hard mushroom fanatics that want to get serious. This expert shrooming knowledge will provide you with your own lifetime supply of professional grade mushrooms or the opportunity to cash in on a highly desired and extremely profitable crop. Of course if you just want to grow a ton of mushrooms to give away we absolutely support that decision too :)

PART I: HOBBY MUSHROOMS

shrmmsGrowing your own mushrooms is sustainable, fun, and easy to get started. Here’s what you’ll need:
-WoodMost mushrooms grow best on hardwood trees, but there are also a few species that proliferate on softwoods. Oak is often suggested. If you are using another type of wood it is preferable to use trees with a thick outer bark and higher ratio of sapwood to heartwood.
A good rule of thumb to keep in mind is that the denser the wood, the longer it will take to decompose, thereby it will continue to produce mushrooms for a longer period of time.
-Inoculated DowelsYou’ll need some spores to get you started which can be bought as wooden pegs which have been inoculated for you. If you can’t find any at your local garden center you can order some online on Amazon, for instance. Some other varieties on sale via Amazon include: Reishi, Pink Oyster, Pearl Oyster, and King Oyster. 
-DrillYou’ll need a drill to create holes in which to insert the dowels.
-WaxMelt some wax down and cover the holes after inserting the pegs to protect against the elements and unwanted infection.
After your first harvest, new mushrooms will continue to pop out every 2-3 weeks. Enjoy!

PART II: SERIOUS SHROOMING

Andrew Bojanowski, Eddy Farm
First shiitake flush from a group of logs. (Andrew Bojanowski, Eddy Farm)
To date, most forest cultivation of shiitake mushrooms has been conducted in the southern and Midwestern regions of the U.S. where the climate, available substrate tree species and markets differ from those in the Northeast.
This manual outlines best management practices for shiitake mushroom cultivation and sales in the northeastern United States. In addition, the manual also includes anecdotes and tips from experienced growers in the region, data gathered from farms starting their operation, and the latest academic research.

Information Sources

Expert Tips and Tricks
Some of the growers involved in this project have been growing and selling shiitake mushrooms for many years. Wherever applicable, they have shared helpful tidbits that helped them save time and money, and increase their own mushroom production.
Expert Opinions
Shiitake mushrooms have been grown in the U.S. only since the early 1980s so the process of cultivating shiitake mushrooms is still in its relative infancy. For many topics, there is no definite “right” way. For these situations, we have drawn on expertise from growers through their hands-on experience. These included not only the original four expert commercial shiitake growers involved in the SARE project that culminates in this guide, but also may others participating in the listserv that was initiated to foster communication among many more growers. Use this information to help yourself make informed decisions.
Grower Results
Twenty-seven beginning growers were chosen to participate in a SARE grant “Cultivation of Shiitake Mushrooms as an Agroforesty Crop in New England.” After attending a series of workshops including an on-farm visit to a shiitake grower and enterprise development training, each participant inoc ulated 100 bolts (logs) on their property with shiitake spawn, managed their laying yard, harvested and sold mushrooms, all the while keeping records of labor, expenses, production and sales. During the summer and fall of 2012 they completed their first harvest season and submitted their records. The results were analyzed to determine realistic estimates of the time requirements and costs of starting an operation and what profits they could expect to gen erate. Using their results, we were also able to draw some broad conclusions regarding production techniques.
UVM Mushrooms Listserv
Since 2010, over 100 growers and mushroom enthusiasts have been involved in a Northeast-based mushroom listserv. Much of the material for this manual was drawn from valuable discussions that took place over the listserv.
Northeast Forest Mushrooms Growers NetworkThe Northeast Forest Mushroom Growers Network website is the official online meeting place for the NE SARE‐funded project, Cultivation of Shiitake Mushrooms as an Agroforestry Crop for New England. The aim is to provide information about the cultivation of specialty forest mushrooms and foster communication and cooperation among amateur and professional mushroom growers. On the website, you can learn about upcoming events and mushroom inoculation classes, download the latest fact sheets and publications, watch video demonstrations of inoculation techniques, register your farm in your mushroom grower directory and much more. Check it out at http://blogs.cornell.edu/mushrooms/
Cornell University Ongoing Shiitake ResearchSince 2006 Ken Mudge and coworkers at Cornell University have been conducting research on shiitake and other specialty forest mushrooms at the Arnot Forest near Ithaca, N.Y. This research has focused on four broad areas including substrate tree species, seasonal consideration, laying yard manage ment, and cultivation of lion’s mane mushrooms. The results of some of that research are shown in the graphs within this guide.
http://www.amazon.com/The-Shiitake-Mushroom-Kit-Mushrooms/dp/B0009IR4CK
http://www.amazon.com/Shiitake-Mushroom-Mycelium-Plug-Spawn/dp/B00BJ5F84S

Monday, 15 February 2016

Sourdough Crackers-NOT Hardtack.

Ingredients
1 C Whole Wheat Flour or White Whole Wheat Flour
1/2 tsp. sea salt
1 C unfed ("discarded") sourdough starter
1/4 cup (4 Tbsp.) unsalted butter, room temperature
2 Tbsps. . dried herbs of your choice, optional
  oil for brushing
  coarse salt (such as kosher or sea salt) for sprinkling on top
Instructions
Mix together the flour, salt, sourdough starter, butter, and optional herbs to make a smooth(not sticky), cohesive dough.
Divide the dough in half, and shape each half into a small rectangular slab. Cover with plastic wrap, and refrigerate for 30 minutes, or up to a couple of hours, until the dough is firm.
Preheat the oven to 400°F.
Very lightly flour a piece of parchment, your rolling pin, and the top of the dough.
Working with one piece at a time, roll the dough to about 1/16" thick. The dough will have ragged, uneven edges; that's OK. Just try to make it as even as possible.
Transfer the dough and parchment together onto a baking sheet. Lightly brush with oil and then sprinkle the salt over the top of the crackers.
Cut the dough into 1 1/4" squares; a rolling pizza wheel works well here.
Prick each square with the tines of a fork.
Bake the crackers for about 20 minutes, until the squares are starting to brown around the edges.
When fully browned, remove the crackers from the oven, and transfer them to a cooling rack. Store airtight at room temperature for up to a week; freeze for longer storage.

Yield: about 100 crackers, 20 servings.~~~Al (Alex-Alexander) D Girvan

FRESH BLUEBERRY SCONES

Ingredients
2 Cs Unbleached All-Purpose Flour or Pastry Flour
1/2 tsp. salt
1/4 C sugar
1 Tbsp. baking powder
6 Tbsps. cold butter, cut into pieces
2 large eggs, beaten
1/3 C vanilla yogurt
1/2 Tsp. vanilla extract
1 Tbsp. lemon zest (grated lemon rind); or 1/4 tsp. lemon oil
1 C  blueberries (preferably wild), picked over and rinsed
2 Tbsps. melted butter
2 Tbsps. sugar
Instructions
Preheat the oven to 375°F. Sift the dry ingredients together in a bowl. Add the butter and rub it into the dry ingredients with your fingers.
Stir the eggs, yogurt, vanilla extract, and lemon zest or oil together. Add to the dry ingredients and stir just until combined. Stir in the blueberries. This dough is the consistency of a wet drop-cookie dough.
Liberally flour your counter and your hands. Take the dough out of the bowl and place it on the counter. Pat it into a 1" thick rectangle. Cut into 10 triangular scones. Place on a well-greased cookie sheet.

Brush the scones with melted butter, and sprinkle with sugar. Bake for 20 minutes, or until lightly browned and a cake tester inserted into a scone comes out dry. Cool completely on a rack.~~~Al (Alex-Alexander) D. Girvan.

FRESH APPLE CINNAMON SCONES

Ingredients:
SCONES
2 3/4 Cs Unbleached All-Purpose Flour
1/3 C granulated sugar
3/4 tsp. salt
1 Tbsp. baking powder
1 tsp.  Apple Pie Spice or ground cinnamon
1/2 cup (8 Tbsps.) cold butter
3/4 cup diced fresh apple, in 1/2" pieces (about half a medium apple); leave the skin on, if you like
3/4 C cinnamon chips
2 large eggs
1 tsp. vanilla extract
1/2 C applesauce, unsweetened preferred
TOPPING
3 Tbsps. coarse white sparkling sugar
1/2 tsp.ground cinnamon
Instructions
In a large mixing bowl, whisk together the flour, sugar, salt, baking powder, and spice.
Work in the butter just until the mixture is unevenly crumbly; it's OK for some larger chunks of butter to remain unincorporated.
Stir in the chopped apple and cinnamon chips.
In a separate mixing bowl, whisk together the eggs, vanilla, and applesauce.
Add the liquid ingredients to the dry ingredients and stir until all is moistened and holds together.
Line a baking sheet with parchment; if you don't have parchment, just use it without greasing it. Sprinkle a bit of flour atop the parchment or pan.
Scrape the dough onto the floured parchment or pan, and divide it in half. Gently pat and round each half into a 5" to 5 1/2" circle about 3/4" thick.
To make the topping: Stir together the coarse sugar and cinnamon. Brush each circle with milk, and sprinkle with the topping.
Using a knife or bench knife that you've run under cold water, slice each circle into 6 wedges.
Carefully pull the wedges away from the center to separate them just a bit; there should be about 1/2" space between them, at their outer edges.
For best texture and highest rise, place the pan of scones in the freezer for 30 minutes, uncovered. While the scones are chilling, preheat the oven to 425°F.
Bake the scones for 18 to 22 minutes, or until they're golden brown. When you pull one away from the others, it should look baked all the way through; the edge shouldn't look wet or unbaked.
Remove the scones from the oven, and cool briefly on the pan. Serve warm. When they're completely cool, wrap in plastic and store at room temperature for up to several days.

Yield: 12 scones.~~~Al (Alex-Alexander) D. Girvan

Bacon-cheddar-chive Scones


Though  we usually think of scones as sweet, not savory. These rich, tender scones are packed with chunks of cheddar cheese ,and diced bacon, accented with fresh chives. Serve them with soup or a salad for a satisfying meal.


Ingredients
CRUST
2 C Unbleached All-Purpose Flour or Pastry Blend
1 tsp. salt
1 Tbsp. baking powder
2 tsps. sugar
4 Tbsps. cold butter
1 C very coarsely grated or diced cheddar cheese
1/3 cup snipped fresh chives or finely diced scallion tops (the green part)
1/2 pound bacon, cooked, cooled, and crumbled (about 1 cup)
3/4 cup + 2 Tbsp. heavy cream or whipping cream, or enough to make the dough cohesive
Instructions
Preheat the oven to 425°F. Lightly grease a baking sheet, or line it with parchment.
Mix together the flour, salt, baking powder, and sugar. Work the butter into the flour until the mixture is unevenly crumbly, with some of the butter remaining in larger pieces.
Mix in the cheese, chives, and bacon until evenly distributed.
Add ¾ cup of the cream, stirring to combine. Try squeezing the dough together; if it's crumbly and won't hang together, or if there are crumbs remaining in the bottom of the bowl, add cream until the dough comes together. Transfer the shaggy dough to a well-floured work surface.
Pat the dough into a smooth 7" disk about 3/4" thick. Transfer the disk to the prepared baking sheet. Use a knife or bench knife to cut the disk into 8 wedges, spreading the wedges apart a bit on the pan.
Brush the scones with a bit of cream; this will help their crust brown.
Bake the scones for 22 to 24 minutes, until they're golden brown. Remove them from the oven, and cool right on the pan. Serve warm, or at room temperature. Want to make scones now, freeze and bake later? Make scones up to the point they're on the baking sheet, cut and ready to bake; don't brush them with cream. Freeze, then remove from the sheet, and wrap airtight in a plastic bag. When you're ready to bake, remove however many you want to bake from the freezer, place on a baking sheet, brush with cream, and bake in a preheated 425°F oven for 35 to 40 minutes, until golden brown.

Make mini-scones: Divide the dough in half, and roll each half into a 5" round. Cut each round into 8 wedges. Bake in a preheated 425°F oven till golden brown, 18 to 20 minutes; or for about 25 minutes if frozen.©Al (Alex-Alexander) D Girvan. All rights reserved

SCONES-Here's Your Basic "Start Here" Recipe.


While this simple vanilla scone is delicious as is, it's also the perfect vehicle for your favourite add-ins.

Ingredient's
DOUGH
2 3/4 Cs  Unbleached All-Purpose Flour
1/3 C sugar
3/4 tsp.  salt
1 Tbsp. baking powder
1/2 C cold butter
1 C to 2 C diced dried fruit, chocolate or other flavoured chips, nuts, or a combination, optional
2 large eggs
2 tsps. vanilla extract or the flavoring of your choice
1/2 C to 2/3 C half and half or milk
Topping
2 tsps. milk
2 Tbsps. s sparkling white sugar or cinnamon sugar, optional

Instructions:
In a large mixing bowl, stir together the flour, sugar, salt, and baking powder.
Work in the butter just until the mixture is unevenly crumbly; it's OK for some larger chunks of butter to remain unincorporated.
Stir in the fruit, chips, and/or nuts, if you're using them.
In a separate mixing bowl, whip together the eggs, vanilla or other flavor, and half and half or milk.
Add the liquid ingredients to the dry ingredients and stir until all is moistened and holds together.
Line a baking sheet with parchment; if you don't have parchment, just use it without greasing it. Sprinkle a bit of flour atop the parchment or pan.
Scrape the dough onto the floured parchment or pan, and divide it in half. Round each half into a 5" circle (if you haven't incorporated any add-ins); or a 6" circle (if you've added fruit, nuts, etc.). The circles should be about 3/4" thick.
Brush each circle with milk, and sprinkle with coarse white sparkling sugar or cinnamon sugar, if desired.
Using a knife or bench knife that you've run under cold water, slice each circle into 6 wedges.
Carefully pull the wedges away from the centre to separate them just a bit; there should be about 1/2" space between them, at their outer edges.
For best texture and highest rise, place the pan of scones in the freezer for 30 minutes, uncovered. While the scones are chilling, preheat the oven to 425°F.
Bake the scones for 20 to 25 minutes, or until they're golden brown. When you pull one away from the others, it should look baked all the way through; the edge shouldn't look wet or unbaked.

Remove the scones from the oven, and cool briefly on the pan. Serve warm. When they're completely cool, wrap in plastic and store at room temperature for up to several days.©Al (Alex-Alexander) D. Girvan. All rights reserved.